1. Should your resume have a career goal/ objective statement? A resume that is worthy of representing you, should clearly state your career objective. A career objective is an indirect way of advertising what all you would bring to the company/ role. It must display a ‘giving’ attitude and not a ‘taking’ attitude.
2. What sequence should your story follow?
Be it work experience or education, always tell the story from the current/ most recent to the first. NEVER write it the other way round.
3. Does your resume need to mention your marital status?
The new age resume does not require you to mention your marital status. However, if the job advertisement clearly states this as a requirement, do fulfil it. Quick Take
* Include a sharp Career Goal
* Choose the pdf format with discretion
* Fonts: Use Times New Roman, Calibri or Verdana
* Run a spell check
* Tweak to suit position and company of a potential employer
* Your latest work stint must appear first
* save the doc/pdf with meaning full name like : thanooj_j2ee_2.7yrs_25032011.
* writing a cover letter
Dear _______, I am applying for the role of ___________________ at your esteemed organisation _____________________.
4. How should you treat references?
Unless you have been specifically asked to provide references, it is acceptable to state in your covering letter/ email that you will provide references on request. Usually, two references are sufficient. Try to provide references from the two most recent phases of your career.
It is a good idea to inform the referees that you are giving out their contact information. It will also help if they know what kind of jobs you are applying for.
5. Should you send the resume as an MS Word document or a PDF?
Some organisations ask you to upload your resume. Usually they ask for an MS Word document. If you are mailing across your resume, you could choose either format.
A word of caution – do not get carried away if you decide to make it a PDF. Keep it simple – leave out visual histrionics. And whatever software you choose – send the resume in the most commonly used version.
The biggest advantage of using a pdf format is that it preserves the formatting irrespective of the version of the Acrobat Reader version or user settings.
6. Should you incorporate links in the resume?
If you are an engineer who writes a technical blog, go ahead and incorporate the link in your resume. If you are a website developer, the links to the pages created by you would certainly help.
Friday, March 25, 2011


Tuesday, March 22, 2011
Struts 1.x – Multiple configuration files.

1. Single module
A single module support multiple Struts configuration files.


In the web.xml, you can separate multiple Struts configure file by a comma “,“.

Test it:
1.http://localhost:8080/StrutsExample/Page1.do
It will display the page1.jsp
2.http://localhost:8080/StrutsExample/common/Welcome.do
It will display the page2.jsp
Both Struts configuration are loaded property.
--------------------------------------------------------
2. Multiple modules
Multiple modules, each has own Struts configuration files.

Both “struts-config-admin.xml” and “struts-config-common.xml” files contains the same settings, Struts is able to differential it via the “config” parameter value in web.xml.
struts-config-admin.xml, struts-config-common.xml

web.xml
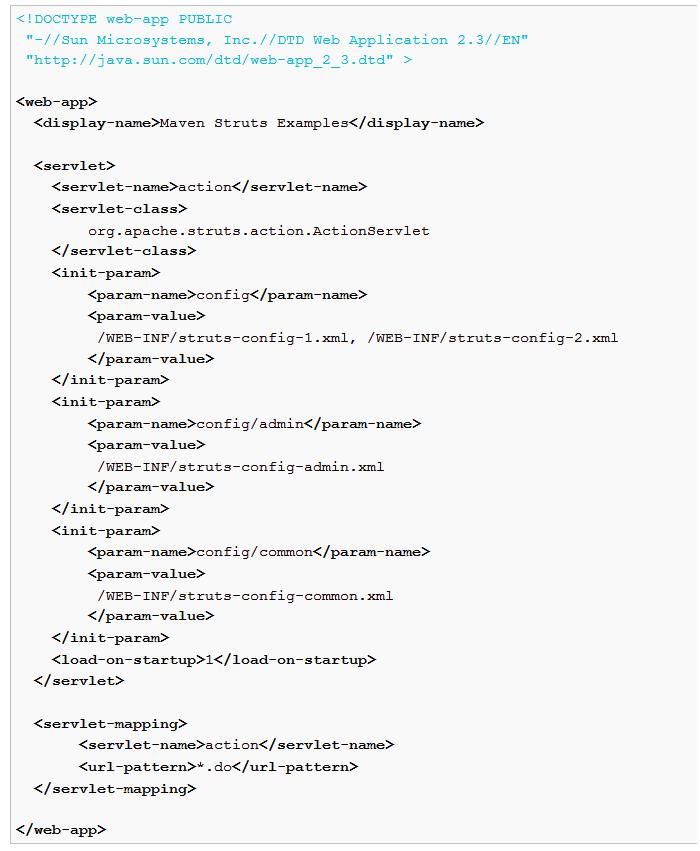
Test it
The “config/admin” will match to this URL pattern – http://localhost:8080/StrutsExample/admin/
The “config/common” will match to this URL pattern – http://localhost:8080/StrutsExample/common/
1.http://localhost:8080/StrutsExample/admin/Welcome.do
It will display the admin/welcome.jsp
2.http://localhost:8080/StrutsExample/common/Welcome.do
It will display the common/welcome.jsp
Each modules has own Struts configuration file.
Thursday, February 3, 2011
Tomcat manager console
we do discuss about tomcat manager console login :
we do for tomcat server installation, while installing it, i will ask us to give userName/password, though that we can access tomcat manager console.
where as, when we go for tomcat.zip, it won't ask for manager userName/pwd or so.
after unzipping tomcat.zip.
we need to set
JAVA_HOME=%{where our JAVA JDK s/w installed(reside)}%
CATALINA_HOME=%{where our Tomcat s/w unzip/installed(reside)}%
done.
now, when we try to access manager's console, then we need to edit %{CATALINA_HOME}%\conf\tomcat-users.xml
edit tomcat-users.xml :
if you already started tomcat server, shutdown server before edit

and save it.done.
now, run startup.bat
goto http://localhost:8080/
click on 'Tomcat Manager'
it will ask for userName/pwd, provide your specific details.
done.
we do for tomcat server installation, while installing it, i will ask us to give userName/password, though that we can access tomcat manager console.
where as, when we go for tomcat.zip, it won't ask for manager userName/pwd or so.
after unzipping tomcat.zip.
we need to set
JAVA_HOME=%{where our JAVA JDK s/w installed(reside)}%
CATALINA_HOME=%{where our Tomcat s/w unzip/installed(reside)}%
done.
now, when we try to access manager's console, then we need to edit %{CATALINA_HOME}%\conf\tomcat-users.xml
edit tomcat-users.xml :
if you already started tomcat server, shutdown server before edit

and save it.done.
now, run startup.bat
goto http://localhost:8080/
click on 'Tomcat Manager'
it will ask for userName/pwd, provide your specific details.
done.
Monday, January 17, 2011
Unit testing with JUnit and EasyMock
What is a unit test?For the case of this tutorial, we'll define a unit test as a test of a single isolated component in a repeatable way. Let's go thru that one section at a time to get a clearer idea of what goes into a unit test.
"a test". This means to verify something is correct. In order for us to have a valid unit test, we need to actually validate that after a start condition A, an end condition B exists. "...a single isolated component...". This is what separates a unit test from other types of tests. In order for it to be a unit test, it must test something in isolation, aka without dependencies. The reason for this is that we are testing the component itself and not it's interaction with other components (that is an integration test). Finally, although most definitions don't include this piece, "...in a repeatable way" is a very important piece of the definition. It's one thing to run a test that passes. It's quite different to have something you can run in a repeatable manor at any point to see if changes you made effected how the component behaves. For example, if you choose to do some refactoring to improve performance, can you rerun your unit test to verify that you didn't change the behavior of the component.
Setup
I will be using Eclipse 3.3 Europa to do this tutorial. To begin, create a new java project and call it JUnitTutorial. Right click on your new project and select New --> Folder. Name it lib and click Finish. Usually you don't want to package your test code with your regular code, so let's make an additional source directory, test. To do that, right click on your new project and select Properties. Select Java Build Path from the available options. In the Java Build Path window, click Add Folder. From the Add Folder dialog, select Create New Folder, name it test and click Finish. Next we need to add JUnit to our build path. Since it comes with Eclipse, all we need to do is to go to the Libraries tab, click the button Add Library, select JUnit and click Next. Select JUnit 4 and click Finish. Click ok to exit the Preferences window. We will also need to download and add the EasyMock jar files to our project. You can find the jars here. Once you download the zip file (we are using version 2.3 for this tutorial), extract the easymock.jar file and place it in the lib folder you created earlier. In Eclipse, right click on your project and select Properties. On the menu to the left, click Java Build Path and select the Libraries tab. Click the button Add Jar on the right. In the window that pops up, add the easymock.jar and click Ok. Click Ok to close the Properties window. You should now be ready to start your development.
The requirementsIn test driven design, we develop the unit test before the functionality. We write a test that verifies that the class should do X after our call. We prove that the test fails, we then create the component to make the test pass. In this case, we are going to create a service with a method that authenticates a user. Below is a class diagram of the scenario.

The interfacesWe will start our coding by defining two interfaces, LoginService and UserDAO We will implement LoginService, however since in this tutorial UserDAO will be mocked, we won't bother implementing it right now. For LoginService, we have a single method that takes a String userName and String password and returns a boolean (true if the user was found, false if it was not). The interface looks like this:
/**
* Provides authenticated related processing.
*/
public interface LoginService {
/**
* Handles a request to login. Passwords are stored as an MD5 Hash in
* this system. The login service creates a hash based on the paramters
* received and looks up the user. If a user with the same userName and
* password hash are found, true is returned, else false is returned.
*
* @parameter userName
* @parameter password
* @return boolean
*/
boolean login(String userName, String password);
}
The UserDAO interface will look very similar to the LoginService. It will have a single method that takes a userName and hash. The hash is an MD5 hashed version of the password, provided by the above service.
/**
* Provides database access for login related functions
*/
public interface UserDAO {
/**
* Loads a User object for the record that
* is returned with the same userName and password.
*
* @parameter userName
* @parameter password
* @return User
*/
User loadByUsernameAndPassword(String userName, String password);
}
The test caseBefore we begin development, we will develop our test. Tests are structured by grouping methods that perform a test together in a test case. A test case is a class that extends junit.framework.TestCase. So in this case, we will begin by developing the test case for LoginService. To start, in your test directory, create a new class named LoginServiceTest and make it extend junit.framework.TestCase.
The lifecycle of a test execution consists of three main methods:
public void setUp()setUp is executed before each of the test. It is used to perform any setup required before the execution of your test. Your implementation will override the default empty implementation in TestCase.
public void testSomething()testSomething is the actual test method. You may have many of these within a single test case. Each one will be executed by your test runner and all errors will be reported at the end.
public void tearDown()tearDown is executed after each test method. It is used to perform any cleanup required after your tests.
So to begin flushing out our test case, we'll start with the setUp method. In this method, we'll instantiate an instance of the service to be tested. We'll also create our first mock object, UserDAO. You can see the source of our test below.
import junit.framework.TestCase;
import static org.easymock.EasyMock.createStrictMock;
import static org.easymock.EasyMock.expect;
import static org.easymock.EasyMock.replay;
import static org.easymock.EasyMock.verify;
import static org.easymock.EasyMock.eq;
/**
* Test case for LoginService.
*/
public class LoginServiceTest extends TestCase{
private LoginServiceImpl service;
private UserDAO mockDao;
/**
* setUp overrides the default, empty implementation provided by
* JUnit's TestCase. We will use it to instantiate our required
* objects so that we get a clean copy for each test.
*/
@Override
public void setUp() {
service = new LoginServiceImpl();
mockDao = createStrictMock(UserDAO.class);
service.setUserDAO(mockDao);
}
}
EasyMock works by implementing the proxy pattern. When you create a mock object, it creates a proxy object that takes the place of the real object. The proxy object gets it's definition from the interface you pass when creating the mock. We will define what methods are called and their returns from within our test method itself.
When creating a mock object, there are two types, a mock and a strict mock. In either case, our test will tell the mock object what method calls to expect and what to return when they occur. A basic mock will not care about the order of the execution of the methods. A strict mock, on the other hand, is order specific. Your test will fail if the methods are executed out of order on a strict mock. In this example, we will be using a strict mock.
The next step is to create our actual test method (for reference, we will not be implementing a tearDown method for this test case, it won't be needed in this example). In our test method, we want to test the following scenario:

Even with the very basic method we want to test above, there are still a number of different scenarios that require tests. We will start with the "rosy" scenario, passing in two values and getting a user object back. Below is the source of what will be our new test method.
...
/**
* This method will test the "rosy" scenario of passing a valid
* username and password and retrieveing the user. Once the user
* is returned to the service, the service will return true to
* the caller.
*/
public void testRosyScenario() {
User results = new User();
String userName = "testUserName";
String password = "testPassword";
String passwordHash =
"�Ӷ & I7���Ni=.";
expect(mockDao.loadByUsernameAndPassword(eq(userName), eq(passwordHash)))
.andReturn(results);
replay(mockDao);
assertTrue(service.login(userName, password));
verify(mockDao);
}
...
So let's go thru the code above. First, we create the expected result of our DAO call, results. In this case, our method will just check to see if an object was returned, so we don't need to populate our user object with anything, we just need an empty instance. Next we declare the values we will be passing into our service call. The password hash may catch you off guard. It's considered unsafe to store passwords as plain text so our service will generate an MD5 hash of the password and that value is the value that we will pass to our DAO.
The next line is a very important line in our test that alot happens, so let's walk thru it step by step:
expect(mockDao.loadByUsernameAndPassword()This is a call to the static method EasyMock.expect. It tells your mock object to expect the method loadByUsernameAndPassword to be called.
eq(userName), eq(passwordHash)
This code isn't always needed. When EasyMock compares the values passed to the method call, it does and == comparison. Because we are going to create the MD5 hash within our method, an == check will fail, so we have to use one of EasyMock's comparators instead. The eq comparator in this case will compare the contents of the string using it's .equals method. If we were not doing the MD5 hash, this line would be expect(mockDao.loadByUsernameAndPassword(userName, password).andReturn(results);
.andReturn(results);This tells our mock object what to return after this method is called.
The final three lines are the ones that do the testing work. replay(mockDao); tells EasyMock "We're done declaring our expectations. It's now time to run what we told you". assertTrue(service.login(userName, password)); does two things: executes the code to be tested and tests that the result is true. If it is false, the test will fail. Finally, verify(mockDao); tells EasyMock to validate that all of the expected method calls were executed and in the correct order.
So that's it for the test. Now all we have to do is write the code to make it pass. You can find that below.
import java.security.MessageDigest;
import java.security.NoSuchAlgorithmException;
public class LoginServiceImpl implements LoginService {
private UserDAO userDao;
public void setUserDAO(UserDAO userDao) {
this.userDao = userDao;
}
@Override
public boolean login(String userName, String password) {
boolean valid = false;
try {
String passwordHash = null;
MessageDigest md5 = MessageDigest.getInstance("MD5");
md5.update(password.getBytes());
passwordHash = new String(md5.digest());
User results =
userDao.loadByUsernameAndPassword(userName, passwordHash);
if(results != null) {
valid = true;
}
} catch (NoSuchAlgorithmException ignore) {}
return valid;
}
}
ConclusionSo that is it. I hope this gives you a more in depth view into JUnit and EasyMock. Unit testing is something that once you get used to it, makes you code better, provides you with a safety net for future refactoring and protects you from being burned by API changes. I strongly encourage that you give it a try. Until next time.
"a test". This means to verify something is correct. In order for us to have a valid unit test, we need to actually validate that after a start condition A, an end condition B exists. "...a single isolated component...". This is what separates a unit test from other types of tests. In order for it to be a unit test, it must test something in isolation, aka without dependencies. The reason for this is that we are testing the component itself and not it's interaction with other components (that is an integration test). Finally, although most definitions don't include this piece, "...in a repeatable way" is a very important piece of the definition. It's one thing to run a test that passes. It's quite different to have something you can run in a repeatable manor at any point to see if changes you made effected how the component behaves. For example, if you choose to do some refactoring to improve performance, can you rerun your unit test to verify that you didn't change the behavior of the component.
Setup
I will be using Eclipse 3.3 Europa to do this tutorial. To begin, create a new java project and call it JUnitTutorial. Right click on your new project and select New --> Folder. Name it lib and click Finish. Usually you don't want to package your test code with your regular code, so let's make an additional source directory, test. To do that, right click on your new project and select Properties. Select Java Build Path from the available options. In the Java Build Path window, click Add Folder. From the Add Folder dialog, select Create New Folder, name it test and click Finish. Next we need to add JUnit to our build path. Since it comes with Eclipse, all we need to do is to go to the Libraries tab, click the button Add Library, select JUnit and click Next. Select JUnit 4 and click Finish. Click ok to exit the Preferences window. We will also need to download and add the EasyMock jar files to our project. You can find the jars here. Once you download the zip file (we are using version 2.3 for this tutorial), extract the easymock.jar file and place it in the lib folder you created earlier. In Eclipse, right click on your project and select Properties. On the menu to the left, click Java Build Path and select the Libraries tab. Click the button Add Jar on the right. In the window that pops up, add the easymock.jar and click Ok. Click Ok to close the Properties window. You should now be ready to start your development.
The requirementsIn test driven design, we develop the unit test before the functionality. We write a test that verifies that the class should do X after our call. We prove that the test fails, we then create the component to make the test pass. In this case, we are going to create a service with a method that authenticates a user. Below is a class diagram of the scenario.

The interfacesWe will start our coding by defining two interfaces, LoginService and UserDAO We will implement LoginService, however since in this tutorial UserDAO will be mocked, we won't bother implementing it right now. For LoginService, we have a single method that takes a String userName and String password and returns a boolean (true if the user was found, false if it was not). The interface looks like this:
/**
* Provides authenticated related processing.
*/
public interface LoginService {
/**
* Handles a request to login. Passwords are stored as an MD5 Hash in
* this system. The login service creates a hash based on the paramters
* received and looks up the user. If a user with the same userName and
* password hash are found, true is returned, else false is returned.
*
* @parameter userName
* @parameter password
* @return boolean
*/
boolean login(String userName, String password);
}
The UserDAO interface will look very similar to the LoginService. It will have a single method that takes a userName and hash. The hash is an MD5 hashed version of the password, provided by the above service.
/**
* Provides database access for login related functions
*/
public interface UserDAO {
/**
* Loads a User object for the record that
* is returned with the same userName and password.
*
* @parameter userName
* @parameter password
* @return User
*/
User loadByUsernameAndPassword(String userName, String password);
}
The test caseBefore we begin development, we will develop our test. Tests are structured by grouping methods that perform a test together in a test case. A test case is a class that extends junit.framework.TestCase. So in this case, we will begin by developing the test case for LoginService. To start, in your test directory, create a new class named LoginServiceTest and make it extend junit.framework.TestCase.
The lifecycle of a test execution consists of three main methods:
public void setUp()setUp is executed before each of the test. It is used to perform any setup required before the execution of your test. Your implementation will override the default empty implementation in TestCase.
public void testSomething()testSomething is the actual test method. You may have many of these within a single test case. Each one will be executed by your test runner and all errors will be reported at the end.
public void tearDown()tearDown is executed after each test method. It is used to perform any cleanup required after your tests.
So to begin flushing out our test case, we'll start with the setUp method. In this method, we'll instantiate an instance of the service to be tested. We'll also create our first mock object, UserDAO. You can see the source of our test below.
import junit.framework.TestCase;
import static org.easymock.EasyMock.createStrictMock;
import static org.easymock.EasyMock.expect;
import static org.easymock.EasyMock.replay;
import static org.easymock.EasyMock.verify;
import static org.easymock.EasyMock.eq;
/**
* Test case for LoginService.
*/
public class LoginServiceTest extends TestCase{
private LoginServiceImpl service;
private UserDAO mockDao;
/**
* setUp overrides the default, empty implementation provided by
* JUnit's TestCase. We will use it to instantiate our required
* objects so that we get a clean copy for each test.
*/
@Override
public void setUp() {
service = new LoginServiceImpl();
mockDao = createStrictMock(UserDAO.class);
service.setUserDAO(mockDao);
}
}
EasyMock works by implementing the proxy pattern. When you create a mock object, it creates a proxy object that takes the place of the real object. The proxy object gets it's definition from the interface you pass when creating the mock. We will define what methods are called and their returns from within our test method itself.
When creating a mock object, there are two types, a mock and a strict mock. In either case, our test will tell the mock object what method calls to expect and what to return when they occur. A basic mock will not care about the order of the execution of the methods. A strict mock, on the other hand, is order specific. Your test will fail if the methods are executed out of order on a strict mock. In this example, we will be using a strict mock.
The next step is to create our actual test method (for reference, we will not be implementing a tearDown method for this test case, it won't be needed in this example). In our test method, we want to test the following scenario:

Even with the very basic method we want to test above, there are still a number of different scenarios that require tests. We will start with the "rosy" scenario, passing in two values and getting a user object back. Below is the source of what will be our new test method.
...
/**
* This method will test the "rosy" scenario of passing a valid
* username and password and retrieveing the user. Once the user
* is returned to the service, the service will return true to
* the caller.
*/
public void testRosyScenario() {
User results = new User();
String userName = "testUserName";
String password = "testPassword";
String passwordHash =
"�Ӷ & I7���Ni=.";
expect(mockDao.loadByUsernameAndPassword(eq(userName), eq(passwordHash)))
.andReturn(results);
replay(mockDao);
assertTrue(service.login(userName, password));
verify(mockDao);
}
...
So let's go thru the code above. First, we create the expected result of our DAO call, results. In this case, our method will just check to see if an object was returned, so we don't need to populate our user object with anything, we just need an empty instance. Next we declare the values we will be passing into our service call. The password hash may catch you off guard. It's considered unsafe to store passwords as plain text so our service will generate an MD5 hash of the password and that value is the value that we will pass to our DAO.
The next line is a very important line in our test that alot happens, so let's walk thru it step by step:
expect(mockDao.loadByUsernameAndPassword()This is a call to the static method EasyMock.expect. It tells your mock object to expect the method loadByUsernameAndPassword to be called.
eq(userName), eq(passwordHash)
This code isn't always needed. When EasyMock compares the values passed to the method call, it does and == comparison. Because we are going to create the MD5 hash within our method, an == check will fail, so we have to use one of EasyMock's comparators instead. The eq comparator in this case will compare the contents of the string using it's .equals method. If we were not doing the MD5 hash, this line would be expect(mockDao.loadByUsernameAndPassword(userName, password).andReturn(results);
.andReturn(results);This tells our mock object what to return after this method is called.
The final three lines are the ones that do the testing work. replay(mockDao); tells EasyMock "We're done declaring our expectations. It's now time to run what we told you". assertTrue(service.login(userName, password)); does two things: executes the code to be tested and tests that the result is true. If it is false, the test will fail. Finally, verify(mockDao); tells EasyMock to validate that all of the expected method calls were executed and in the correct order.
So that's it for the test. Now all we have to do is write the code to make it pass. You can find that below.
import java.security.MessageDigest;
import java.security.NoSuchAlgorithmException;
public class LoginServiceImpl implements LoginService {
private UserDAO userDao;
public void setUserDAO(UserDAO userDao) {
this.userDao = userDao;
}
@Override
public boolean login(String userName, String password) {
boolean valid = false;
try {
String passwordHash = null;
MessageDigest md5 = MessageDigest.getInstance("MD5");
md5.update(password.getBytes());
passwordHash = new String(md5.digest());
User results =
userDao.loadByUsernameAndPassword(userName, passwordHash);
if(results != null) {
valid = true;
}
} catch (NoSuchAlgorithmException ignore) {}
return valid;
}
}
ConclusionSo that is it. I hope this gives you a more in depth view into JUnit and EasyMock. Unit testing is something that once you get used to it, makes you code better, provides you with a safety net for future refactoring and protects you from being burned by API changes. I strongly encourage that you give it a try. Until next time.
Friday, August 20, 2010
Static imports in java 1.5
Static imports allow the static items of another class to be referenced without qualification.
package com;

import static com.StaticImportMe.doStaticImportOnMe;

public class StaticImport {

 /**
  * @param args
  */
 public static void main(String[] args) {
  /**
   * No need to use StaticImportMe.doStaticImportOnMe(args[0]);
   */
  doStaticImportOnMe(args[0]);
 }

}
Saturday, July 31, 2010
Threads - Thread Synchronization
* every instance of class Object and its subclass's has a lock
* primitive data type fields (Scalar fields) can only be locked via their enclosing class
* fields cannot be marked as synchronized however they can be declared volatile which orders the way they can be used or you can write synchronized accessor methods
* array objects can be synchronized BUT their elements cannot, nor can their elements be declared volatile
* Class instances are Objects and can be synchronized via static synchronized methods
Synchronized blocks
* allow you to execute synchronized code that locks an object without requiring you to invoke a synchronized method
synchronized( expr ) {
// 'expr' must evaluate to an Object
}
Synchronized methods
* declaring a method as synchronized ie synchronized void f() is equivalent to
void f() { synchronized(this) {
// body of method
}
}
* the synchronized keyword is NOT considered part of a method's signature. IT IS NOT AUTOMATICALLY INHERITED when subclasses override superclass methods
* methods in Interfaces CANNOT be declared synchronized
* constructors CANNOT be declared synchronized however they can contain synchronized blocks
* synchronized methods in subclasses use the same locks as their superclasses
* synchronization of an Inner Class is independent on it's outer class
* a non-static inner class method can lock it's containing class by using a synchronized block
synchronized(OuterClass.this) {
// body
}
Locking
* locking follows a built-in acquire-release protocol controlled by the synchronized keyword
* a lock is acquired on entry to a synchronized method or block and released on exit, even if the exit is the result of an exception
* you cannot forget to release a lock
* locks operate on a per thread basis, not on a per-invocation basis
* Java uses re-entrant locks ie a thread cannot lock on itself
class Reentrant {
public synchronized void a() {
b();
System.out.println("here I am, in a()");
}
public synchronized void b() {
System.out.println("here I am, in b()");
}
}
* in the above code, the synchronized method a(), when executed, obtains a lock on it's own object. It then calls synchronized method b() which also needs to acquire a lock on it's own object
* if Java did not allow a thread to reacquire it's own lock method b() would be unable to proceed until method a() completed and released the lock; and method a() would be unable to complete until method b() completed. Result: deadlock
* as Java does allow reentrant locks, the code compiles and runs without a problem
* the locking protocol is only followed for synchronized methods, it DOES NOT prevent unsynchronized methods from accessing the object
* once a thread releases a lock, another thread may acquire it BUT there is no guarantee as to WHICH thread will acquire the lock next
Class fields and methods
* locking an object does not automatically protect access to static fields
* protecting static fields requires a synchronized static block or method
* static synchronized statements obtain a lock on the Class vs an instance of the class
* a synchronized instance method can obtain a lock on the class
synchronized(ClassName.class) {
// body
}
* the static lock on a class is not related to any other class including it's superclasses
* a lock on a static method has no effect on any instances of that class (JPL pg 185)
* you cannot effectively protect static fields in a superclass by adding a new static synchronized method in a subclass; an explicit block synchronization is the preferred way
* nor should you use synchronized(getClass()); this locks the actual Class which might be different from the class in which the static fields are declared
* primitive data type fields (Scalar fields) can only be locked via their enclosing class
* fields cannot be marked as synchronized however they can be declared volatile which orders the way they can be used or you can write synchronized accessor methods
* array objects can be synchronized BUT their elements cannot, nor can their elements be declared volatile
* Class instances are Objects and can be synchronized via static synchronized methods
Synchronized blocks
* allow you to execute synchronized code that locks an object without requiring you to invoke a synchronized method
synchronized( expr ) {
// 'expr' must evaluate to an Object
}
Synchronized methods
* declaring a method as synchronized ie synchronized void f() is equivalent to
void f() { synchronized(this) {
// body of method
}
}
* the synchronized keyword is NOT considered part of a method's signature. IT IS NOT AUTOMATICALLY INHERITED when subclasses override superclass methods
* methods in Interfaces CANNOT be declared synchronized
* constructors CANNOT be declared synchronized however they can contain synchronized blocks
* synchronized methods in subclasses use the same locks as their superclasses
* synchronization of an Inner Class is independent on it's outer class
* a non-static inner class method can lock it's containing class by using a synchronized block
synchronized(OuterClass.this) {
// body
}
Locking
* locking follows a built-in acquire-release protocol controlled by the synchronized keyword
* a lock is acquired on entry to a synchronized method or block and released on exit, even if the exit is the result of an exception
* you cannot forget to release a lock
* locks operate on a per thread basis, not on a per-invocation basis
* Java uses re-entrant locks ie a thread cannot lock on itself
class Reentrant {
public synchronized void a() {
b();
System.out.println("here I am, in a()");
}
public synchronized void b() {
System.out.println("here I am, in b()");
}
}
* in the above code, the synchronized method a(), when executed, obtains a lock on it's own object. It then calls synchronized method b() which also needs to acquire a lock on it's own object
* if Java did not allow a thread to reacquire it's own lock method b() would be unable to proceed until method a() completed and released the lock; and method a() would be unable to complete until method b() completed. Result: deadlock
* as Java does allow reentrant locks, the code compiles and runs without a problem
* the locking protocol is only followed for synchronized methods, it DOES NOT prevent unsynchronized methods from accessing the object
* once a thread releases a lock, another thread may acquire it BUT there is no guarantee as to WHICH thread will acquire the lock next
Class fields and methods
* locking an object does not automatically protect access to static fields
* protecting static fields requires a synchronized static block or method
* static synchronized statements obtain a lock on the Class vs an instance of the class
* a synchronized instance method can obtain a lock on the class
synchronized(ClassName.class) {
// body
}
* the static lock on a class is not related to any other class including it's superclasses
* a lock on a static method has no effect on any instances of that class (JPL pg 185)
* you cannot effectively protect static fields in a superclass by adding a new static synchronized method in a subclass; an explicit block synchronization is the preferred way
* nor should you use synchronized(getClass()); this locks the actual Class which might be different from the class in which the static fields are declared
Subscribe to:
Posts (Atom)